----------
While trying to import an image into opensim that has a
Kromwyrm |
Dark Maelstrom flash games |
Dark Maelstrom t-shirt designs |
 |
|
|||||||||
| Miscellaneous Opensim how to items. | |||||||||
| July 30, 2019 | |||||||||
| Some short "how to" items. | |||||||||
| ---------- | |||||||||
| How to upload textures: | |||||||||
| At the top of the firestorm browser: | |||||||||
| Build --> Upload --> Image --> | |||||||||
| then, navigate to file on hard drive | |||||||||
| ---------- | |||||||||
| How to edit the terrain's textures: | |||||||||
| At the top of the firestorm browser, menu items: | |||||||||
| World --> Region Details --> Terrain | |||||||||
| Here its possible to change the textures of each corner of the region. | |||||||||
| Its also possible here to change the terrain's raise and lower limits. | |||||||||
| ---------- | |||||||||
| How to increase the draw distance: | |||||||||
| At the top of the firestorm browser, menu items: | |||||||||
| Preferences --> Graphics --> Draw Distance (set it to: 720 m) | |||||||||
| ---------- | |||||||||
| Pressing keys automatically starts "nearby chat". | |||||||||
| To change this to movement controls instead: | |||||||||
| Preferences --> Move & View --> Movement --> | |||||||||
| (check) Pressing letter keys affects movement instead of nearby chat | |||||||||
---------- |
|||||||||
| To change from strafing to turning in the key movements: | |||||||||
| Edit the file: "keys.xml" | |||||||||
| "keys.xml" is located at: c:\Program Files\FirestormOS-Release..\ | |||||||||
| \app_settings\keys.xml | |||||||||
| Change: | |||||||||
| <binding key="A" mask="NONE" command="slide_left"/> | |||||||||
| <binding key="D" mask="NONE" command="slide_right"/> | |||||||||
| <binding key="LEFT" mask="NONE" command="slide_left"/> | |||||||||
| <binding key="RIGHT" mask="NONE" command="slide_right"/> | |||||||||
| To: | |||||||||
| <binding key="A" mask="NONE" command="turn_left"/> | |||||||||
| <binding key="D" mask="NONE" command="turn_right"/> | |||||||||
| <binding key="LEFT" mask="NONE" command="turn_left"/> | |||||||||
| <binding key="RIGHT" mask="NONE" command="turn_right"/> | |||||||||
| ---------- | |||||||||
| How to find objects nearby in the Firestorm viewer: | |||||||||
| Firestorm menu --> World --> Area Search (for objects) | |||||||||
| ---------- | |||||||||
| Some file locations. | |||||||||
| location of "Settings.ini" | |||||||||
| ...\DreamGrid\OutworldzFiles | |||||||||
| location of "XYSettings.ini" | |||||||||
| ...\DreamGrid\OutworldzFiles | |||||||||
| location of "Opensim.ini" | |||||||||
| ...\DreamGrid\OutworldzFiles\Opensim\bin\Regions\island_1 | |||||||||
| ---------- | |||||||||
| Setting a new complex object for others to "take copy" is a bit bugged. | |||||||||
| One solution is to set the object up for sale, for $0. | |||||||||
| Except this may leave the "(no copy)" property on the new user's item. | |||||||||
| The other option is to check every item individually, and make sure that | |||||||||
| they are all set to "copy" for all users as well. (this doesn't seem to work all the time) | |||||||||
| The best solution appears to be, to create an empty box, then | |||||||||
| place the full item inside of the empty box. | |||||||||
| When the user picks up the box, they can then copy the box as often as they want, | |||||||||
| and maybe even transfer the box to another. | |||||||||
| The box will need to be set to "for sale" for G$0. | |||||||||
| The "take copy" setting may still not work for the box. | |||||||||
| The "(no copy)" may still effect the objects inside. | |||||||||
| ---------- | |||||||||
| Location of snapshots taken by firestorm. | |||||||||
| It is currently unkown, and no else seems to know where | |||||||||
| the snapshots end up within the hard drive, but: | |||||||||
| Here is how to reset the location for the snapshots moving forward: | |||||||||
| Avatar --> Snapshot --> save as | |||||||||
| (at one point firestorm would append the date and some info to the | |||||||||
| snapshot's file name, but information on this cannot be currently found) | |||||||||
| ---------- | |||||||||
| Setting new login splash page snapshot. | |||||||||
| Go to the Start Location setting: | |||||||||
| Avatar --> Preferences --> General --> Start Location | |||||||||
| Switch between My Last Location and My Home, or vice versa. | |||||||||
| ... Then log off and log back in. | |||||||||
| Location of the splash page images: | |||||||||
| C:\Users\user_name\AppData\Roaming\Firestorm\avatars_name\ | |||||||||
| ---------- | |||||||||
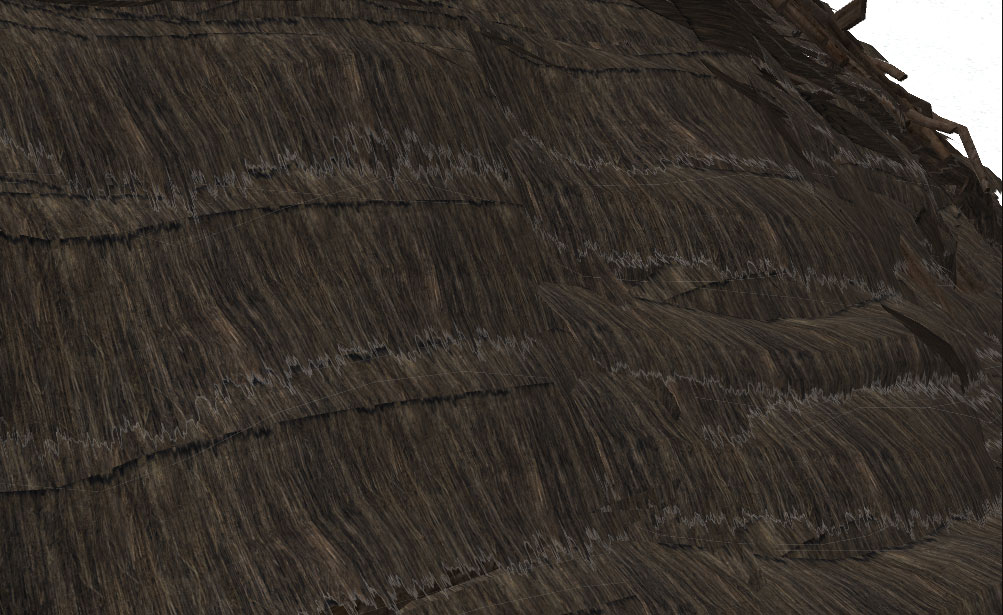
| Removing a gray edge on a transparent png texture. | |||||||||
While trying to import an image into opensim that has a |
|||||||||
| transparent portion, sometimes a grey edge can appear along | |||||||||
| the interface between the colored pixels and the transparent pixels. | |||||||||
| Here is a sample portion of such a texture: | |||||||||
| (the example below shows a snapshot of the side of a straw hut, with the texture applied) | |||||||||
| Below we can see a gray edge at the interface between | |||||||||
| the image and the transparent part of the image: | |||||||||
|
|||||||||
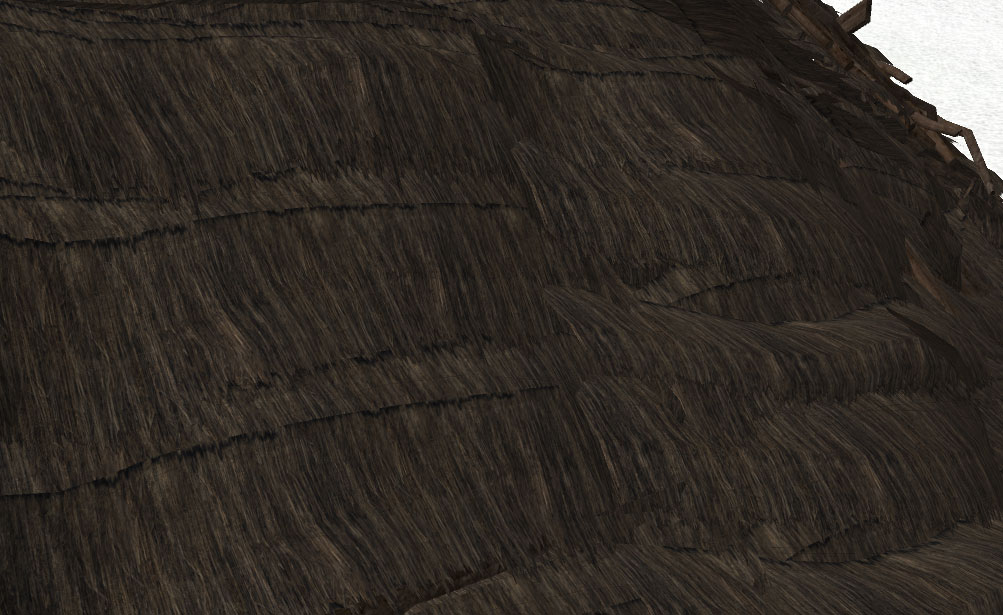
| Below we can see a corrected texture, without the grey edge | |||||||||
| at the interface between the image and the transparent part of the image: | |||||||||
|
|||||||||
| The texture in the first image above had been created in photoshop | |||||||||
| and saved as a PNG-24 upon export. | |||||||||
| The texture in the second image above had been created in photoshop | |||||||||
| and saved as a PNG-8 upon export. | |||||||||
| Saving the image file as a PNG-8 was able to remove the grey edge artifact. | |||||||||
| ---------- | |||||||||
| back | |||||||||
|
|||||||||